Making musical hardware
January 10th, 2018 | Published in hardware
I’ve been interested in sound engineering with synthesizers, mixing desks and effects units since I was at school. A couple of years ago, I discovered Eurorack modular synths and started to combine these interests with my more recently-obtained skills in amateur hardware hacking. The Eurorack scene that’s been developing over the last 20 years is a fascinating one, attracting all sizes of makers from synth manufacturing giants to one-person DIY operations. Because it’s based on a simple analog standard of 3.5mm jacks and control voltages, it’s trivial to combine hardware from all over the world into a rack of modules that’s entirely your own design. Creating your own modules is also within the reach of a reasonably experienced Arduino hacker.
After buying some Eurorack modules in October 2015, I quickly decided that I wanted to integrate my laptop into the setup. Unfortunately most computers aren’t capable of generating the full range of positive and negative voltages (ideally from +/-5V or +/-10V) required to connect to Eurorack. There are a small number of external audio interfaces that are “DC Coupled” which allows a full range of voltages to pass. I was lucky enough to find one such interface on my local Craigslist for $75: a MOTU 828 Firewire unit from 2001 that is still perfectly compatible with modern Macs after adding a Firewire to Thunderbolt dongle.
Using the Expert Sleepers Silent Way plugin, I was able to generate waveforms through the MOTU to control my synth hardware. This was only a partial success, however: measuring the output signals on my oscilloscope I discovered that the minimum and maximum voltages at full gain were about +/-2.88 volts. I decided to dive into the analog electronics domain and fix this problem.
The Swiss Army knife of analog electronics is the op-amp. This incredibly flexible part can be used to construct signal amplifiers, adders, inverters, filters and all sorts of other circuits. It’s essentially an analog computer, performing realtime arithmetic on continuously-varying voltages. After years of only tinkering with Arduinos in the digital domain, this was a revelation to me. There is a world of signal between the binary zero and one.
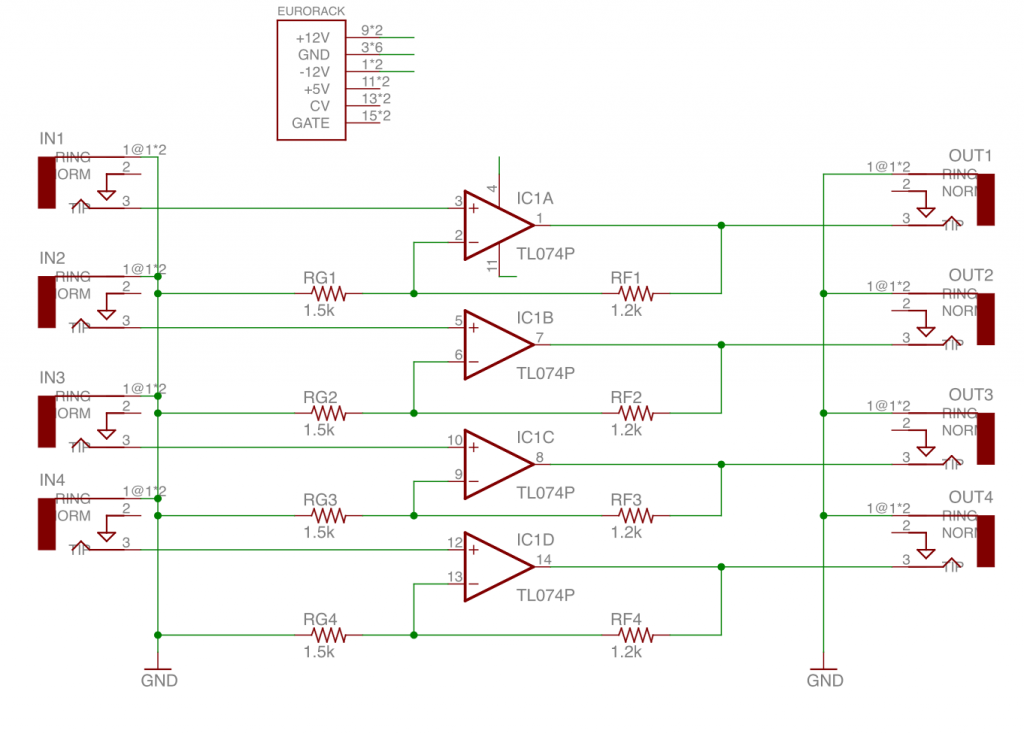
Using a handy op amp gain calculator I calculated the correct values of resistors that could be used to create a signal gain of around 1.77 without inverting or offsetting. This would result in my +/-2.88 volt signal being boosted to around +/-5V, good for most Eurorack hardware. Packaged ICs containing multiple op-amps are cheap and easily available, so I picked the TL074 quad op-amp package in order to give me four parallel channels of gain. The TL07x family are very common in the DIY synth community and are generally liked for their low levels of noise and distortion in musical applications. I wired the 3.5mm jacks, op-amp and resistors up on a breadboard and was thrilled that it worked first time: my oscilloscope was now measuring a full range of +/-5V for my output signals.
Next, it was time to learn Eagle and create some circuitboards. Here’s the schematic that I came up with:

At the time, the free version of Eagle was limited to a small size of circuit board. Luckily this was a close fit with the Eurorack size constraints, so I was able to lay out my schematic as a PCB with appropriate dimensions and send it off to OSH Park for fabbing. The boards arrived two weeks later and I soldered everything together:

The final step was to create a front panel for my 3U rack so that the PCB could sit with my other modules. I downloaded a laser-cutting template from Ponoko and designed a simple faceplate in Illustrator, using a PDF of the PCB from Eagle as a transparent layer to ensure that the holes for screws and audio jacks would line up. I uploaded this order for production, choosing bamboo wood in the mistaken impression that it would make an interesting alternative to the usual acrylic or metal Eurorack faceplates. Unfortunately it’s not the strongest material for a faceplate, and the laser engraving burns look pretty ugly, but it worked out OK in the end:

This was a pretty involved process for such a simple outcome, but it was immensely satisfying and I learnt a lot of new skills. All the Eagle and Illustrator files are in this Github repository in case you’re interested.