How to stream to YouTube Live from a Skype call

January 22nd, 2019  |  Published in Uncategorized

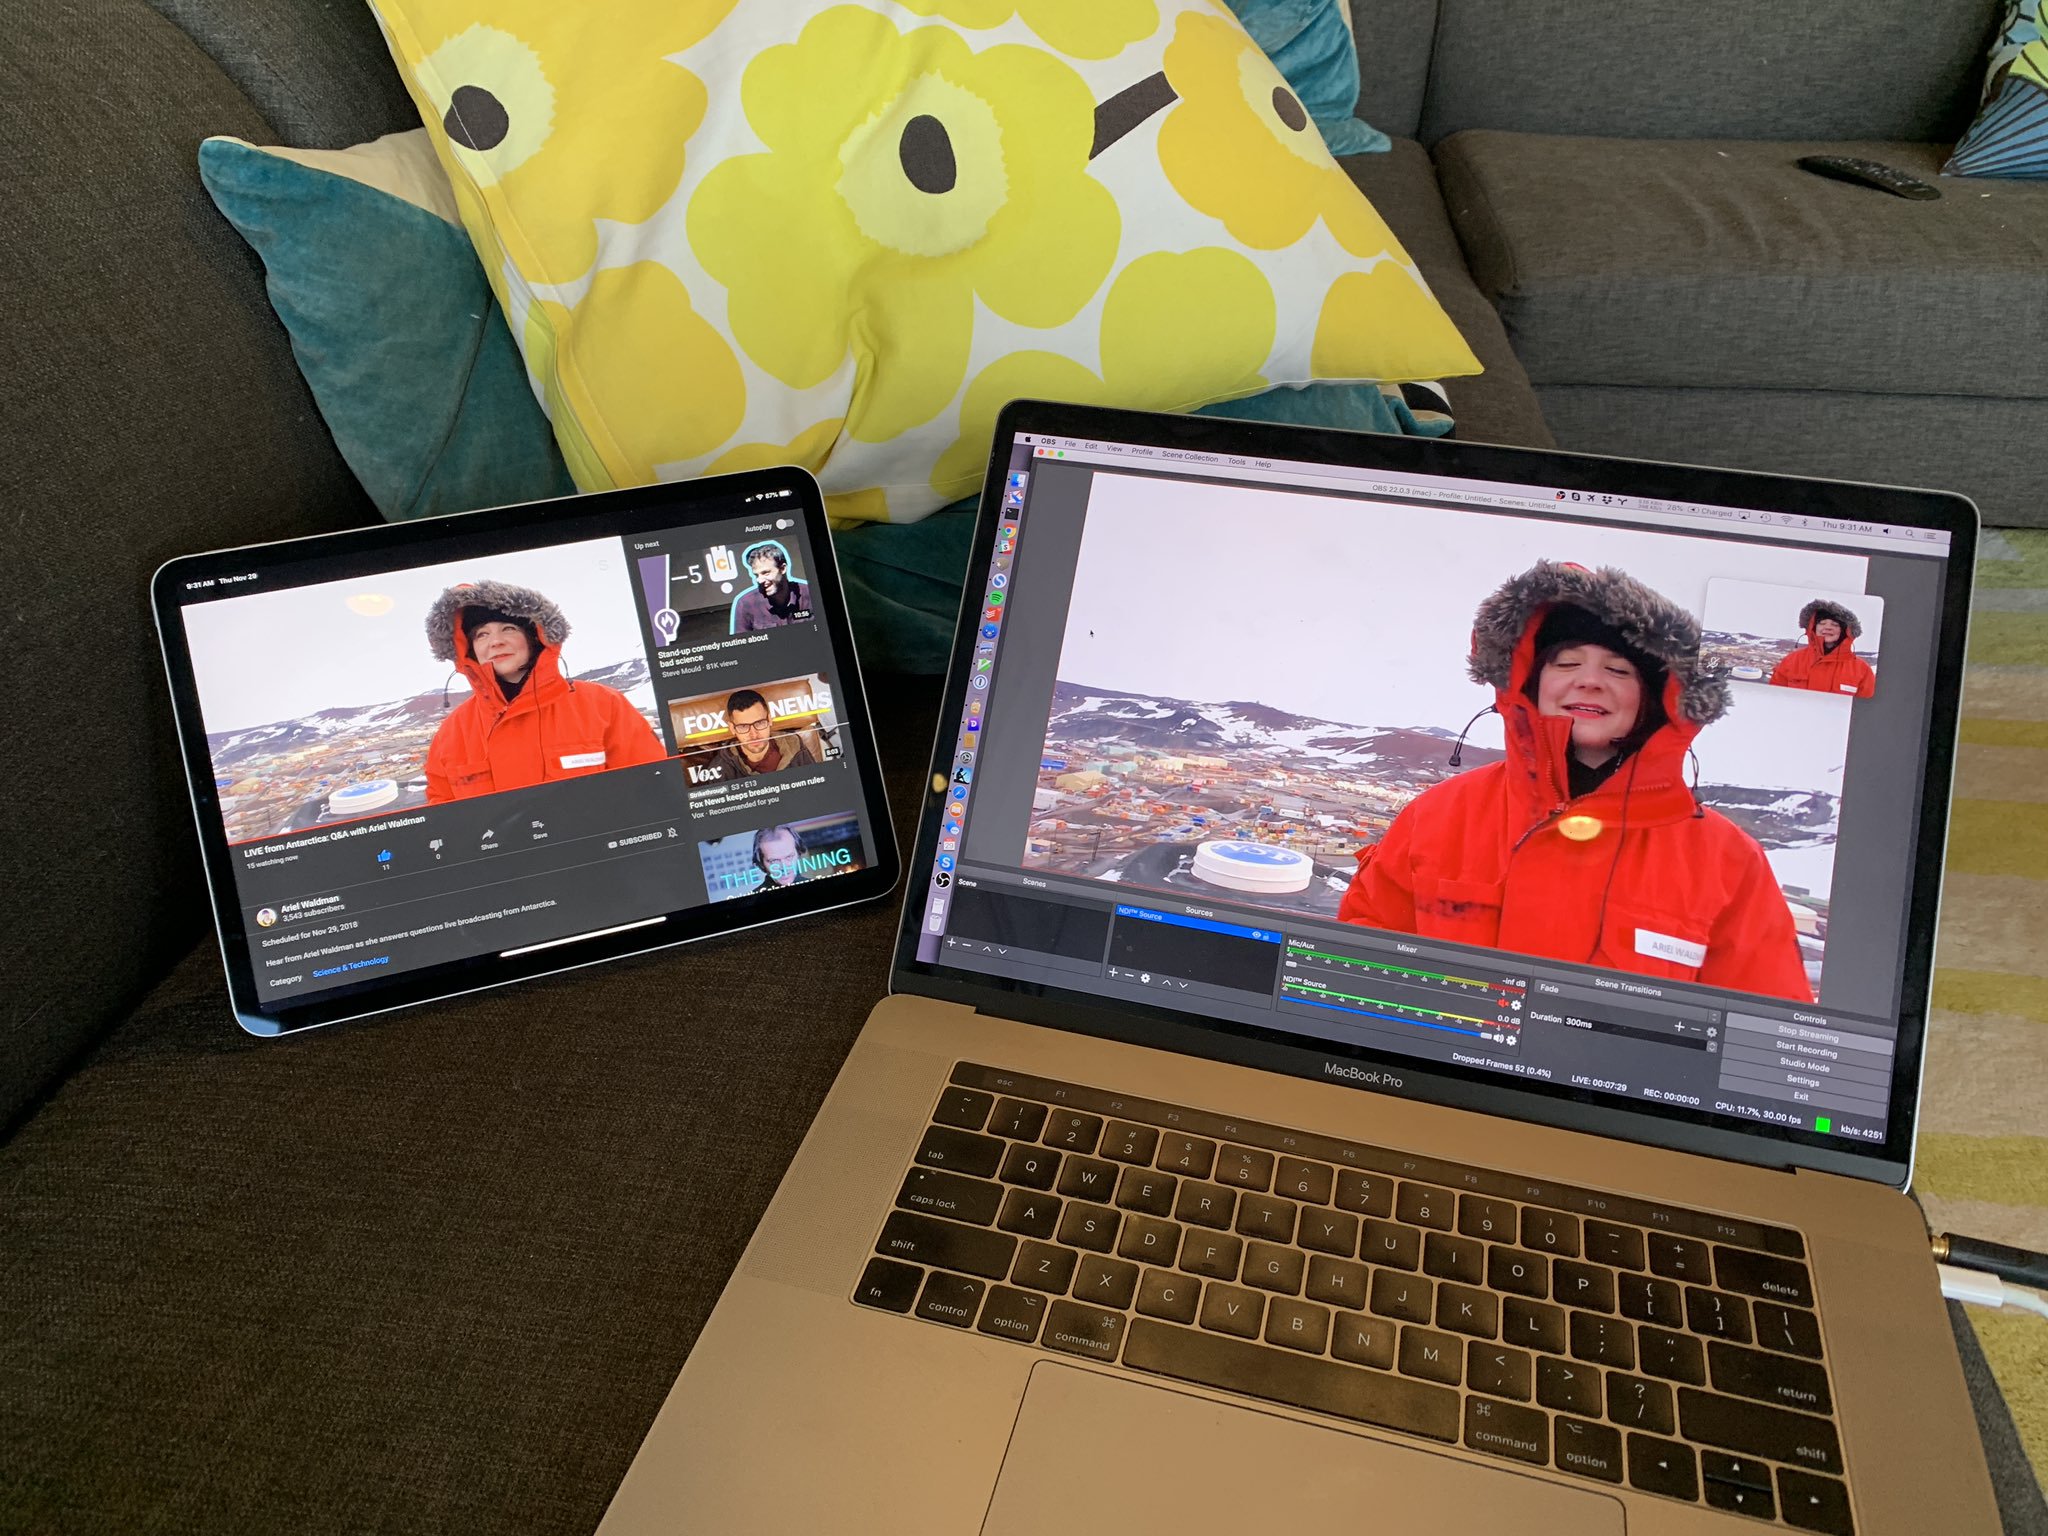
Last month I helped Ariel Waldman run a YouTube Live stream from McMurdo Station in Antarctica where she answered questions from her Patreon supporters. We believe that this is the first time that anyone has broadcasted live to the internet in this way from Antarctica, because the only supported streaming service at McMurdo is Skype. This post is the documentation for the process I used to make this connection.

You will need a collaborator outside of Antarctica who will relay the Skype call to YouTube Live. If you are that collaborator, you will need the following software and hardware:

  1. a computer and a high-bandwidth internet connection. The computer will be encoding MPEG4 video in realtime, so it needs to be reasonably modern and powerful. I used a Macbook Pro with a quad-core Intel i7-3.1Ghz, and my home internet connection which is Comcast cable with a 12Mbps upload speed. You can use a Mac or a PC.
  2. Your own Skype account, and the latest version of the Skype client installed
  3. A copy of OBS installed
  4. The OBS NDI plugin installed into OBS
  5. a YouTube account (or the username and password for YOUR YouTube account)

Set up the Skype client before the call by going to Settings -> Calling -> Advanced and make sure “Allow NDI Usage” is switched on.

Set up the YouTube Live stream before the call by going to YouTube Creator Studio and scheduling a new live event. After the event is created, opt for a “Single-use stream key”, choose “Other encoders” and copy the code given under “Stream Name”. You’ll need it when we configured OBS. Now if you click on “View on watch page”, a new tab will open with the URL that you can distribute to your viewers ahead of the event. It’ll show a placeholder screen until you begin streaming at the time of the event.

And finally, load up OBS before the call begins. Click the Plus icon at bottom left to add a new Scene. Then click Plus under Sources and add a new “NDI Source”. Just click OK for now to accept the defaults – later we’ll use this to connect with the Skype call and receive the audio and video for streaming. In the Mixer section, drag the slider for Mic/Aux down to zero to ensure that sound from your own laptop microphone won’t get incorporated into the stream.

Now go to OBS Preferences and find the Stream section. Select YouTube as the Service type, and under Stream Key you can paste the YouTube code that you copied earlier when you configured the live stream. On the Output section, enter 4000 as the video bitrate. Under Video select a Base Resolution and an Output Resolution of 1280×720. This is the native Skype client resolution at the time I write this. Finally, right-click on the main area of the OBS window in what is currently a big black box. Under “Transform”, turn on “Fit To Screen”. This will ensure that if Skype resizes the video stream due to a poor connection during the call, it still gets scaled by OBS to fit the full resolution of the YouTube Live video window.

When it’s nearly time for the live stream:

  1. Ensure your Skype client is running and logged in
  2. At McMurdo, they should make a video call to your Skype account several minutes before the scheduled live stream
  3. At your end, ensure that NDI is enabled in Skype and double-click on the NDI Source in OBS to bring up its configuration window. There should now be something listed in the dropdown menu under “Source Name” that mentions Skype. Select this and hit OK, and the black box in the main OBS window should start showing the Skype call live. At the McMurdo end, you’ll see a message telling you that the call may be being recorded.
  4. Hit “Start Streaming” in OBS and then go to the YouTube Creator Studio in a web browser. Select your event and go to its “Live Control Room”. You should soon see audio and video appear in a preview window there.
  5. At this point, you will still be able to talk on the Skype call to the person at the McMurdo end. Let them know that you’re ready to put them live, count them down from ten, and hit the button in the YouTube Live Control Room to start the live event.
  6. When it’s all done, stop the event from the YouTube Live Control Room, stop streaming in OBS, and end the Skype call.

If everything goes smoothly then you’ll be rewarded with a high-quality YouTube Live stream that you can monitor on a second device like a phone or tablet. You should expect that there will be as much as 30 seconds lag behind the Skype stream when viewing the stream this way.

Making musical hardware

January 10th, 2018  |  Published in hardware

I’ve been interested in sound engineering with synthesizers, mixing desks and effects units since I was at school. A couple of years ago, I discovered Eurorack modular synths and started to combine these interests with my more recently-obtained skills in amateur hardware hacking. The Eurorack scene that’s been developing over the last 20 years is a fascinating one, attracting all sizes of makers from synth manufacturing giants to one-person DIY operations. Because it’s based on a simple analog standard of 3.5mm jacks and control voltages, it’s trivial to combine hardware from all over the world into a rack of modules that’s entirely your own design. Creating your own modules is also within the reach of a reasonably experienced Arduino hacker.

After buying some Eurorack modules in October 2015, I quickly decided that I wanted to integrate my laptop into the setup. Unfortunately most computers aren’t capable of generating the full range of positive and negative voltages (ideally from +/-5V or +/-10V) required to connect to Eurorack. There are a small number of external audio interfaces that are “DC Coupled” which allows a full range of voltages to pass. I was lucky enough to find one such interface on my local Craigslist for $75: a MOTU 828 Firewire unit from 2001 that is still perfectly compatible with modern Macs after adding a Firewire to Thunderbolt dongle.

Using the Expert Sleepers Silent Way plugin, I was able to generate waveforms through the MOTU to control my synth hardware. This was only a partial success, however: measuring the output signals on my oscilloscope I discovered that the minimum and maximum voltages at full gain were about +/-2.88 volts. I decided to dive into the analog electronics domain and fix this problem.

The Swiss Army knife of analog electronics is the op-amp. This incredibly flexible part can be used to construct signal amplifiers, adders, inverters, filters and all sorts of other circuits. It’s essentially an analog computer, performing realtime arithmetic on continuously-varying voltages. After years of only tinkering with Arduinos in the digital domain, this was a revelation to me. There is a world of signal between the binary zero and one.

Using a handy op amp gain calculator I calculated the correct values of resistors that could be used to create a signal gain of around 1.77 without inverting or offsetting. This would result in my +/-2.88 volt signal being boosted to around +/-5V, good for most Eurorack hardware. Packaged ICs containing multiple op-amps are cheap and easily available, so I picked the TL074 quad op-amp package in order to give me four parallel channels of gain. The TL07x family are very common in the DIY synth community and are generally liked for their low levels of noise and distortion in musical applications. I wired the 3.5mm jacks, op-amp and resistors up on a breadboard and was thrilled that it worked first time: my oscilloscope was now measuring a full range of +/-5V for my output signals.

Next, it was time to learn Eagle and create some circuitboards. Here’s the schematic that I came up with:

At the time, the free version of Eagle was limited to a small size of circuit board. Luckily this was a close fit with the Eurorack size constraints, so I was able to lay out my schematic as a PCB with appropriate dimensions and send it off to OSH Park for fabbing. The boards arrived two weeks later and I soldered everything together:

The final step was to create a front panel for my 3U rack so that the PCB could sit with my other modules. I downloaded a laser-cutting template from Ponoko and designed a simple faceplate in Illustrator, using a PDF of the PCB from Eagle as a transparent layer to ensure that the holes for screws and audio jacks would line up. I uploaded this order for production, choosing bamboo wood in the mistaken impression that it would make an interesting alternative to the usual acrylic or metal Eurorack faceplates. Unfortunately it’s not the strongest material for a faceplate, and the laser engraving burns look pretty ugly, but it worked out OK in the end:

This was a pretty involved process for such a simple outcome, but it was immensely satisfying and I learnt a lot of new skills. All the Eagle and Illustrator files are in this Github repository in case you’re interested.

Natural Language Processing and Machine Learning, some pointers

October 14th, 2012  |  Published in data

I’ve been doing a lot of natural-language machine-learning work both for clients and in side-projects recently. Mark Needham asked me on Twitter for some pointers to good introductory material. Here’s what I wrote for him:

Nearly all text processing starts by transforming text into vectors:
https://en.wikipedia.org/wiki/Vector_space_model

Often it uses transforms such as TFIDF to normalise the data and control for outliers (words that are too frequent or too rare confuse the algorithms):
https://en.wikipedia.org/wiki/Tf%E2%80%93idf

Collocations is a technique to detect when two or more words occur more commonly together than separately (e.g. “wishy-washy” in English) – I use this to group words into n-gram tokens because many NLP techniques consider each word as if it’s independent of all the others in a document, ignoring order:
https://matpalm.com/blog/2011/10/22/collocations_1/
https://matpalm.com/blog/2011/11/05/collocations_2/

When you’ve got a lot of text and you don’t know what the patterns in it are, you can run an “unsupervised” clustering using Latent Dirichlet allocation:
https://www.cs.princeton.edu/~blei/papers/Blei2012.pdf
https://www.youtube.com/watch?v=5mkJcxTK1sQ

Or if you know how your data is divided into topics, otherwise known as “labeled data”, then you can run “supervised” techniques such as training a classifier to predict the labels of new similar data. I can’t find a really good page on this – I picked up a lot in IM with my friend Ben who is writing a book coming out next year: https://blog.someben.com/2012/07/sequential-learning-book/

Here are the tools I’ve mostly been using:

Some blogs I like:

MetaOptimize Q+A is the Stack Overflow of ML: https://metaoptimize.com/qa

The Mahout In Action book is quite good and practical: https://manning.com/owen/

Extracting a social graph from Wikipedia people pages

April 5th, 2012  |  Published in data, graphs  |  1 Comment

I’ve been in San Francisco this week giving a workshop at the Where Conference called Prototyping Location Apps With Big Data. You can read the full slides for the workshop on Slideshare and get the full code and sample data on Github.

The key message of the workshop is that there are plenty of open datasets available on the web which can be used to prototype new applications by acting as proxies for the kind of data you expect to have later in the product lifecycle. You just have to do a bit of lateral thinking and some data-processing. For example, wouldn’t it be great if you were working on a social site and could test your designs, your algorithms and your scalability using a realistic social graph of 300,000 people with over 2 million connections between them? It’d be much better than entering a test dataset by hand using just a few examples from people you know or your family, and it’d make for a much better demo if you took it to an investor or a product board. No more lorem ipsum!

We can generate such a dataset using Wikipedia. Consider the Wikipedia page for Bill Clinton. In just the first three paragraphs there are mentions of people highly related to the former US President: Hillary Clinton, George H.W. Bush and Franklin D. Roosevelt. If we were to consider these intra-wiki links as connections in the social graph (“Bill Clinton knows Hillary Clinton”) and perform this extraction over all of Wikipedia then we’d have a pretty convincing graph. It would have lots of connections, a good mix of communities (politicians, historical figures, television personalities) and a nice mix of well-connected and less-connected people.

Raw Wikipedia text is openly available for download but parsing it is difficult, and doesn’t give us the kind of structured and typed data that we’re looking for. Luckily the DBpedia project has already tackled this problem. They have extracted page types, images, geocoded coordinates, intra-wiki links and many other things, and made them all downloadable. For this hack we’ll need the “Ontology Infobox Types” and the “Wikipedia Pagelinks” datasets.

The types file has one or more lines for each Wikipedia page. For example, the page for Autism is listed as a Thing and a Disease. We’ll filter this file down to just the Person pages. Then we’ll take the links file and filter it down to just the links that are from a Person to another Person (by using the filtered types file we just made). We can do all of this with 18 lines of Apache Pig code then run it through a Hadoop cluster. You can see sample results in the Github project. If we convert it to GraphML format with a JRuby script (using the JUNG library) and load it into Gephi to detect the communities and create a force-directed layout, we get a pleasant and interesting social graph with all the kinds of clusters we’d expect:

You can also explore a simplified version of this graph in PDF format for your zooming pleasure.

On graphs

September 22nd, 2011  |  Published in graphs

I’ve been working on an in-depth post for this blog about graph data and how to analyse it. That post is still unfinished but I’ve been posting pieces of work-in-progress on other sites during the process. Here are some pointers to bring them together:

Algorithmic recruitment with GitHub

February 10th, 2010  |  Published in web  |  20 Comments

In my new job in Berlin I’ve been asked to hire some people to help prototype new, secret projects. Berlin has a superb tech scene but as I’m new in town it’s taking me a little time to get to know everyone. While that’s going on, I wrote some code to help me explore Berlin’s developer community.

When I’m hiring, one of the things I always want to see is evidence of personal projects. Over the last two years, GitHub has become an amazing treasure trove of code, with the best social infrastructure I’ve ever seen on a developer site. GitHub profiles let the user set their location, so I started with a few web searches for Berlin developers. This finds hundreds of interesting people, but how do I prioritise them?

Another thing that I look for when building a good team is someone’s personal network. I’ve always believed strongly in spending lots of time at conferences meeting passionate people who are smarter than me. A good developer can make themselves even more productive by knowing who to email, IM or DM to answer a question when they’re stuck.

A recent article by Stowe Boyd on centrality and influence in social networks reminded me of some of the network analysis we use behind the scenes calculating recommendations for the Dopplr Social Atlas. So I wrote some code to query the GitHub API and analyse the social graph of the Berlin subset of their users.

The JRuby code uses Yahoo BOSS to do the web search. After querying the GitHub API for each user’s followers it builds an in-memory graph using the Java Universal Network/Graph Framework. Then it ranks each user node in the graph using the Betweenness Centrality algorithm. You can see the simple source code on my github.

To sanity-check the results I ran it for a couple of cities I already know well: London and San Francisco. Here are the top 5 for each, which seem quite plausible to me:

San Francisco

  1. Chris Wanstrath, GitHub
  2. Tatsuhiko Miyagawa, Six Apart
  3. Leah Culver, Six Apart
  4. Square Inc
  5. Aman Gupta, ruby eventmachine maintainer

London

  1. James Darling
  2. London Ruby User Group
  3. Mark Norman Francis
  4. Dan Webb (recently moved to Twitter in SF)
  5. Carlos Villela, Thoughtworks

My choice of metric biases these lists towards connectedness and influence — it can’t measure ability. It’s only measuring GitHub users, and they are biased towards Ruby, Perl and Javascript. But seeing names there that I trust gives me confidence that it’ll help me find interesting people in Berlin.

Hopefully some of those people are reading this blog post right now. Others outside Berlin might be interested to know that Nokia does a superb job of relocating people, with everything taken care of by shipping companies and local agents. If you love the web, Javascript, mobile, user experience, social networks, location, enormous datasets and currywurst, you should get in touch.

Scripting “Find My iPhone” from Ruby

July 23rd, 2009  |  Published in Uncategorized

When the iPhone OS 3.0 came out with new Mobile Me features allowing you to remotely discover the location of your iPhone and send it a message and an alarm, I hoped that there’d be an API. While there’s no official way to access it, the enterprising Tyler Hall and Sam Pullara dug out their HTTP sniffers and figured out how the javascript on me.com talks to its backend service.

Their code is written in PHP and Java respectively, two languages I’m not particularly comfortable in. Translating from their source code, I’ve produced a ruby version and packaged it as a very simple gem. It lacks real documentation or elegant error handling, but it’s easy to figure out.

Use it like this to locate your phone:

$ sudo gem install mattb-findmyiphone --source https://gems.github.com

>> require 'rubygems' ; require 'findmyiphone'
>> i = FindMyIphone.new(username,password)
>> i.locateMe
=> {"status"=>1, "latitude"=>51.546544, "time"=>"8:06 AM", "date"=>"July 23, 2009", "accuracy"=>162.957953, "isLocationAvailable"=>true, "isRecent"=>true, "isLocateFinished"=>true, "statusString"=>"locate status available", "isAccurate"=>false, "isOldLocationResult"=>true, "longitude"=>-0.05744}

Important Message on the iPhoneAnd to send a message:

>> i.sendMessage("Unimportant message")
=> {"status"=>1, "time"=>"8:17 AM", "date"=>"July 23, 2009", "unacknowledgedMessagePending"=>true, "statusString"=>"message sent"}

Finally, if you look in the examples directory you’ll find a short script that uses the location data to update Fire Eagle via its API. Fill in the example YAML files with the appropriate credentials and it’ll do the rest.

Of course the code’s all open source and contributions via Github are very welcome.

iPhone coding for web developers

March 28th, 2009  |  Published in iphone, talks, Uncategorized  |  1 Comment

This week the London Flash Platform User Group ran an evening of iPhone developer talks. My talk, “iPhone Coding For Web Developers” seemed to go down well. As a web developer, I’ve found the iPhone development environment exciting in its power and possibilities, but also perplexing in its lack of basic facilities that I’d take for granted in a modern dynamic language. This talk (based on a previous blog post here) goes into some detail about how I use HTTP, JSON and other web-oriented tech in my iPhone work.

Switching from scripting languages to Objective C and iPhone: useful libraries

January 26th, 2009  |  Published in iphone  |  8 Comments

For the last few months I’ve been spending much of my spare hacking time learning to code iPhone applications. I’ve found Objective C to be a surprisingly pleasant language, and Cocoa is one of the best frameworks I’ve ever worked with. I’ve reached a point where I feel I can go fairly quickly from simple app ideas to sketching in real code.

I’m a web developer at heart, and a scripting language user by preference. Coding for the iPhone doesn’t feel as fluid in text handling or HTTP access as the environments I’m used to. Fortunately I’ve been able to find some fantastic open-source libraries and wrappers that make up the difference. Here are my favourites so far:

GTMHTTPFetcher from Google Toolbox for Mac

The iPhone’s native HTTP handling is capable, but low-level and verbose. Rather than handling the many callbacks, NSData objects and options I prefer this wrapper. It has a ton of convenience methods allowing you to specify POST data and basic auth, follow redirects automatically, keep cookies over a session, set headers, and have two simple callbacks for success and error handling. In many ways it’s comparable to jQuery’s $.ajax() one-hit function.

JSON framework

Having got some data over HTTP from a web API, chances are that it’s available in JSON format. This simple framework extends NSString with a JSONValue method to convert any legal JSON string to nested NSDictionaries and NSArrays. To go the other way, dictionaries and arrays gain a JSONRepresentation method.

libxml2 wrappers for XPath over XML and HTML

Perhaps your web API returns XML, or perhaps you’re getting your data by screenscraping HTML. Did you know that the iPhone ships with libxml2, which has high-performance XML and HTML parsing and a high-quality XPath implementation? Don’t struggle with Cocoa’s NSXMLParser or get bogged down in the complex libxml2 docs; use these two simple wrapper functions, PerformXMLXPathQuery and PerformHTMLXPathQuery, to pull out the structured data you need in a Cocoa-friendly representation.

RegexKitLite for regular expressions

Where would scripting be without regular expressions? Luckily they’re available on the iPhone, but buried deep within the ICU libraries. RegexKitLite extends NSString with core regex string handling, including ‘split’ (known as componentsSeparatedByRegex) and a search-and-replace operator (stringByReplacingOccurrencesOfRegex and replaceOccurrencesOfRegex).

FMDB, an Objective C wrapper for sqlite

Every scripting language has convenient database driver wrappers. I was very happy to find that sqlite is available on the iPhone, but unfortunately its interface is all bare-metal C. The simplest wrapper I’ve found so far is FMDB. Apparently somewhat inspired by JDBC, it gives you connection and resultset objects, along with one-liner convenience functions allowing code like [db intForQuery:@"SELECT COUNT(*) FROM things"].

And there’s more…

I’ve used all of the above in a real project, but I’ve got yet more things to explore on my todo list. These include Matt Gemmell’s web-style templating framework MGTemplateEngine, ActorKit for Erlang-style messaging and thread management and the LLVM/Clang Static Analyzer for automatic bug detection. What else do you use?

Google map of London with Flickr shape data overlaid

November 16th, 2008  |  Published in javascript

Flickr place info now includes shape data for many places. See the Flickr code blog for more.

We’ve correlated most of Dopplr’s places with Yahoo WOE IDs using Flickr’s reverse geocoder, so we can use this data too. As an experiment, I wrote some clientside code to overlay this shape data onto the maps we use on Dopplr. Help yourself to the code if you want it: gist.github.com/25502